RAD base |

RAD top |
Robot RB-1 a laptop robot based on a RAD Base |
I recently acquired a RAD Robot on eBay. It was missing the remote control and the (nonstandard) 6V battery, which made it essentially nonfunctional, as these parts are not easily replaced. It was also needed a lot of cleaning. But it was only five bucks (plus another $5 shipping), so I'm not complaining. My son (Kevin) and I are going to turn this into a laptop robot, so all we really wanted was the chassis, treads, motors, and gearboxes.
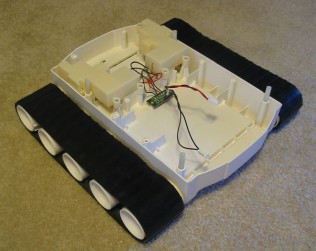
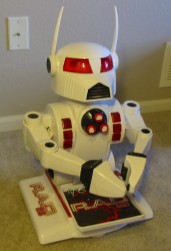
The first thing we did after a quick dusting was to detatch the base from the top, as in Oricom Tech's RAD Hack. I went a bit further, and also took the top shell off the base as well. You can see the result in these pictures:

RAD base |

RAD top |
We tested the motors by connecting them directly to battery packs (either 2 or 4 AA cells). They work fine even at 3V, and even better at 6V. They seem very strong and rather fast, though they are also a bit noisy.
The next step was to mount the laptop. I drill mounting holes in the black expanded PVC sheet to match the positions of the nylon spacers shown above, and also attached eight velcro squares, and affixed the matching eight squares (the soft side) to the bottom of my Powerbook. This worked, but it was rather cramped under there, and I realized that I'd never have room for the Winford ETH32 I/O box I planned to use.
So, I joined my local Freecycle group and asked for a couple of large plastic coffee cans. (I'm not a coffee drinker myself.) This quickly gained me two 52-oz Folgers cans. These couldn't be attached directly to the RAD base, so I cut a piece of white foamboard to make an interface platform. The foamboard screws into the RAD base, and the coffee cans screw into the foamboard. The cans are also bolted together, and finally, the PVC sheet is screwed on top.
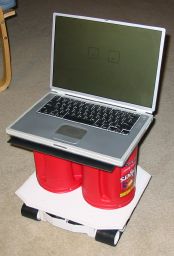
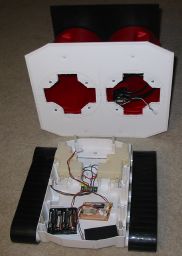
The result is shown below, both as intact assembly (left) and with the foamboard unscrewed so you can see inside (right). This gives the robot plenty of room in two torso chambers. The right one currently contains the USB/serial adapter, with its cable coiled up and held to the inside of the can with Velcro. The left can is currently empty, but that's where the ETH32 is going to go.

RB-1 Assembled |

RB-1 Internals |
That board in the middle is a carrier board for a the Pololu Micro Dual Serial Motor Controller (see the Dec. 15, 2006 entry of my robot log for details). Also in the base are the batteries. All of that is currently loose while I figure out exactly how I want to bolt them down.
I've tested this, and it works: a program on the laptop can drive the beast around, as well as speak and display facial expressions. However, no sensors are hooked up yet. Even worse, the only way to turn the robot on and off is to unscrew the base (as in the rightmost picture above) and connect/disconnect the battery packs. I've just purchased a DPST rocker switch, which should let me set up a power switch so I don't have to partially disassemble the robot every time.
That's as far as we've gotten so far — please come back later to see how the project progresses!